Google Colab Example
It is possible to use ProxAI in Google Colab.
It is recommended to directly follow the instructions from following colabs instead of this documentation page.
🏃♂️➡️ ProxAI Quick Start Tutorial 🏃♂️➡️:
Good for cold starts
🚀 ProxAI Advanced Usage Tutorial 🚀:
Good after spending some time with ProxAI
Installation
Run the following code in a Google Colab cell to install ProxAI:
!pip install proxai
After installation, you need restart the session as instructed in the output of the installation cell:
Get Provider Keys
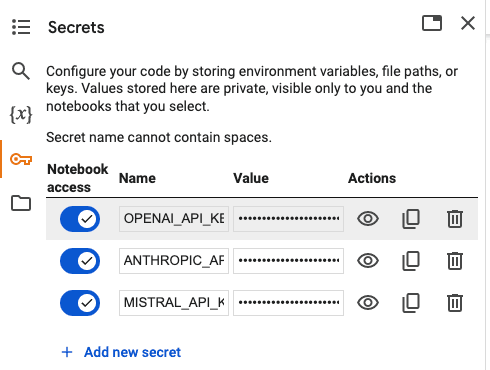
ProxAI works with various providers like Google Gemini, OpenAI, Anthropic, etc. See our provider integrations page for the full list and setup instructions. Add your API keys to the Google Colab secrets.
Run following code after adding the secrets to the notebook environment:
import os
from google.colab import userdata
API_KEY_LIST = [
'GEMINI_API_KEY',
'OPENAI_API_KEY',
'ANTHROPIC_API_KEY',
'XAI_API_KEY',
'DEEPSEEK_API_KEY',
'MISTRAL_API_KEY',
'CO_API_KEY',
'DATABRICKS_HOST',
'DATABRICKS_TOKEN',
'HUGGINGFACE_API_KEY',
'PROXDASH_API_KEY',
]
for api_key in API_KEY_LIST:
try:
os.environ[api_key] = userdata.get(api_key)
except:
continue
Note: This is the safest way to store API keys in Google Colab. When you share the Colab notebook with others, these keys are not visible to them.
Never directly add API key values as string variables inside the Colab cells. Even after deletion, they can be retrieved from the Colab history.
Start Building
It is ready to use:
import proxai as px
provider_models = px.models.list_models(only_largest_models=True)
for provider_model in provider_models:
answer = px.generate_text(
prompt='Hello model',
provider_model=provider_model)
print(f'{provider_model}: {answer}')